
A dependable food culture at home
How to Set Up a Worm Bin for Your Axolotl
Build a simple indoor bin, keep the bedding balanced, prevent odors and pests, and harvest clean worms for your axie.
Use a controlled, pesticide-free worm culture
Do not collect feeding worms from lawns, gardens, compost, or soil that may contain pesticides, fertilizers, animal waste, or other contaminants. Start with correctly identified worms from a reputable vermiculture supplier and use dedicated bin tools.
The straightforward version
A worm bin is useful, but it should make feeding easier - not become another demanding pet
Earthworms are a practical staple food for many juvenile and adult axolotls. Buying them repeatedly can get expensive, so a small indoor culture can provide a convenient supply while turning some kitchen scraps into castings.
Keep food available
A healthy culture gives you worms at home, although it is still smart to keep a suitable backup food for a slow or recovering bin.
Know how they were raised
You choose the bedding, food, location, and maintenance instead of collecting worms from unknown ground.
Scale with actual use
A modest tote is enough for many keepers. Let the population and your axolotl’s appetite tell you whether a second bin is worthwhile.
A bin does not make every worm automatically safe. Correct species, clean inputs, appropriate moisture, and good hygiene all matter. Discard worms from a foul, overheated, contaminated, or collapsing culture.
Species matters
Choose worms that actually live in decomposing bedding
“Nightcrawler” is a trade name used for several different worms. Before ordering, confirm the scientific name and ask whether the worms are raised for vermicomposting. The deep-burrowing nightcrawlers commonly found in yards are not suited to a shallow indoor tote.
The Ambystoma Genetic Stock Center lists earthworms among accepted foods for juvenile and adult axolotls. The bin itself, however, should be designed around the worm species - not just the animal that will eat them.
Red wigglers
Eisenia fetidaSurface-dwelling compost worms that reproduce well in moist organic bedding. They are smaller than many nightcrawlers, so larger axolotls may need more than one.
European nightcrawlers
Confirm the species with the supplierVermiculture-bred European nightcrawlers can work in bins and offer a larger meal. Do not assume every package labeled “nightcrawler” is this type.
Common garden nightcrawlers
Deep-burrowing speciesThese worms depend on cooler, deeper soil and extensive tunnels. They usually decline in a shallow indoor composting bin.
Use what you already have
The basic setup can stay simple
I built mine inexpensively with two plastic storage containers from Walmart. One tote held the worms and bedding; the second sat underneath as a backup catch container. I added ventilation, fine mesh, hydrated coco fiber, and red wigglers.
- Opaque tote with a secure lid
- Optional second tote for the two-tier design
- Drill or another appropriate hole-making tool
- Fine rust-resistant mesh
- Plain shredded cardboard, paper, leaf material, or coco coir
- Correctly identified composting worms
- Dedicated scoop, gloves, and clean cutting scissors
 My videoWatch my worm-bin setup on YouTube▶
Build it once; observe it closely
Set up the bin in five steps
Prepare and air out the complete container before adding worms. Keep powered tools, hot tips, sharp plastic, metal edges, and fresh adhesive away from animals and damp bedding.
- 1Prepare the container
Choose an opaque plastic tote with a secure lid. Drill or melt evenly spaced ventilation holes with the correct tool and safety precautions, then smooth every sharp edge.
- 2Add insect-resistant ventilation
Cover larger holes with fine, rust-resistant mesh. Attach it securely and let any adhesive cure completely outside the bin before worms or damp bedding are added.
- 3Create a drainage plan
A carefully managed bin should not release much liquid. If you use Pat’s two-tote design, add a few drainage holes to the upper tote and inspect the lower tote instead of letting liquid collect unnoticed.
- 4Moisten and fluff the bedding
Hydrate shredded plain cardboard or paper, pesticide-free leaf material, or coco coir until it feels like a wrung-out sponge. Fluff it so air can move through the bedding.
- 5Add the worms and wait
Place the worms on top and let them move away from the light. Give them a quiet day or two before the first small feeding, then observe the bin daily while it settles.
Some temporary surface activity is normal after shipping. Keep the lid secure and the bin dim, but do not use light to mask a continuing escape attempt. A large number of worms climbing the walls means the moisture, temperature, oxygen, bedding, food, or contamination needs to be checked.
Air plus moisture
The bedding should feel like a wrung-out sponge
Worms breathe through moist skin, but a waterlogged bin loses oxygen and can turn foul. Squeeze a handful: it should hold together and feel evenly damp, with only a few drops at most - not release a stream of water.
Fluff compacted bedding and add fresh, damp carbon material as the old bedding is consumed. If the bin is too wet, mix in dry shredded cardboard or paper and pause watery foods. If it is too dry, mist or mix in a small amount of water rather than flooding one corner.
Add moisture gradually and confirm the lid is not allowing excessive airflow.
Worms remain throughout the bedding and food disappears at a steady pace.
Add dry bedding, improve airflow and drainage, and stop feeding until conditions recover.
Red wigglers are most active in a moderate indoor range. Measure the bedding - not only the room - and keep the tote away from direct sun, freezing areas, radiators, and hot appliances.
Feed the culture - not the odor
Start with less food than you think
Bury a small amount of chopped food beneath the bedding in one area, then wait until most of it is gone before adding more. Rotate the feeding location so you can see which pockets are active and which are being ignored.
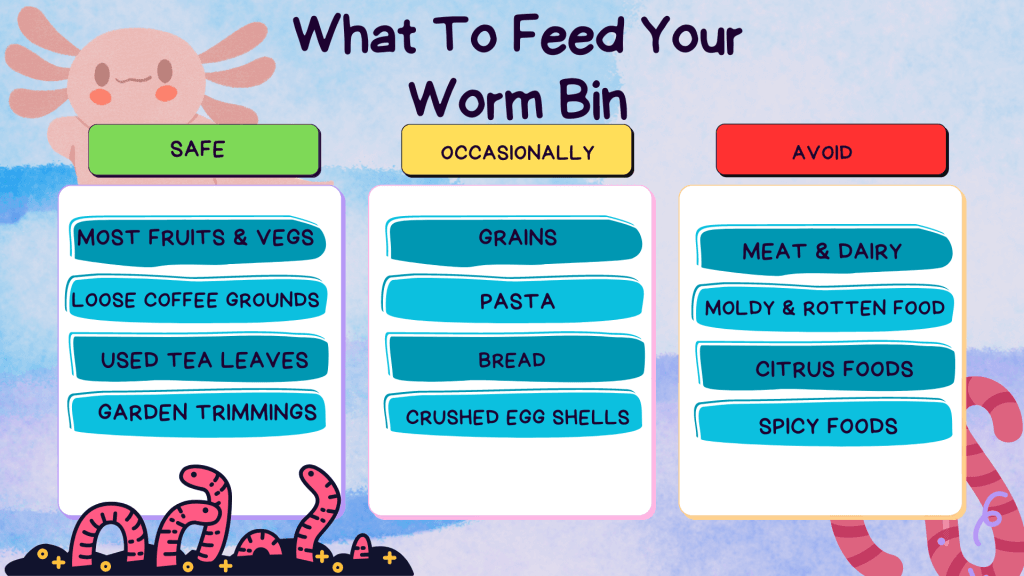
Fruit and vegetable scraps
Use modest portions of pesticide-free produce scraps, coffee grounds with paper filters, tea leaves, and pulverized eggshell for grit.
Bread, pasta, grain, citrus, onion, and garlic
These are not all automatically toxic, but large amounts can clump, mold, smell, attract pests, or shift the bedding’s acidity. A small diverse feeding is easier to manage.
Meat, dairy, oil, salty food, and pet waste
These create odor and sanitation problems and do not belong in a small indoor feeding culture. Also exclude plants exposed to pesticides or herbicides.
Normal decomposition is part of the bin. A little fungal growth on buried food is different from a foul, overheated mass of spoiled food. When scraps sit untouched for weeks, remove the excess and pause feeding.
A two-minute routine
Let the bin tell you what it needs
I look for an earthy smell, moist bedding, normal worm distribution, and food that is steadily disappearing. Over time, the bedding becomes darker as castings accumulate. Remove finished material periodically and replace it with fresh bedding so the worms are not living almost entirely in their own castings.
Do not stir the entire bin aggressively on a fixed schedule. Check a few areas, gently fluff compacted sections, and make the smallest correction that solves the problem.
- Check smell and moisture
- Look for uneaten food
- Inspect the lid and vents
- Bury scraps in a new pocket
- Add fresh bedding as needed
- Inspect the lower tote for liquid
- Check for mites, flies, or predators
- Confirm the bin temperature
- Harvest excess castings
- Separate and return most worms
- Refresh compacted bedding
- Clean the empty outer tote
From bin to feeding dish
Harvest cleanly and offer an appropriate portion
Use dedicated tongs or gloved hands to collect an active worm from a healthy part of the culture. Rinse off every visible piece of bedding with cool, clean water. If the worm is too large, cut it with clean dedicated scissors into pieces your axolotl can swallow comfortably.
Offer the worm promptly with feeding tongs or in the usual feeding area. Remove uneaten pieces before they break apart and affect water quality. Wash your hands and clean the tools after handling the bin - even when you wore gloves.
Keep the diets connected: Use the complete feeding guide for portion, frequency, body-condition, and appetite guidance. The worm bin is a food source, not a feeding schedule.
- 1Choose an active wormSkip worms from a foul, overheated, or contaminated area.
- 2Rinse away the beddingNo soil, coir, food scraps, or castings should remain visible.
- 3Size the portionCut only when needed with clean dedicated scissors.
- 4Feed and observeConfirm the animal swallows normally and remove leftovers.
Fix the cause - not the symptom
Common worm-bin problems
The bin smells rotten or sour
Stop feeding. Remove obvious rotting food, check for dead worms or standing liquid, add dry bedding, and gently restore airflow. A healthy bin should smell mildly earthy.
Many worms are trying to escape
Check internal temperature, moisture, oxygen, recent food, chemical exposure, and the amount of finished castings. Correct the environmental problem instead of relying on a light to force the worms down.
Food is not disappearing
The bin may be too cold, too wet, too acidic, newly established, or simply overfed. Remove the excess and wait. Add the next meal only after the culture is active again.
Fruit flies or fungus gnats appeared
Remove exposed food, bury future scraps beneath several inches of bedding, add a dry bedding cap, keep the lid and mesh secure, and reduce feeding. Freezing scraps before use can help prevent fruit-fly eggs from entering.
There are mites or other tiny organisms
A few decomposer organisms are normal. A sudden population boom often accompanies too much food or moisture. Remove excess scraps and rebalance the bedding. Remove centipedes and other obvious worm predators.
Liquid is collecting in the lower tote
Do not treat this as proof that the bin is thriving. Drain it, check for clogged holes, mix dry bedding into the upper tote, and reduce watery food. Persistent leachate usually means the system is too wet.
The worm population is shrinking
Confirm the species, bedding temperature, moisture, food quantity, acidity, ventilation, and castings level. Review any new paper, coir, plant material, cleaner, adhesive, or pesticide exposure.
My axolotl refuses the worms
Rinse the worm thoroughly and try a smaller portion at the animal’s normal feeding time. Do not leave rejected worms in the aquarium. Use another appropriate food and review the feeding guide if refusal continues.
Sources and further reading
- Ambystoma Genetic Stock Center: Guide to Axolotl Husbandry
- Oregon State University Extension: Composting with Worms
- Utah State University Extension: Vermicomposting
- Illinois Extension: Vermicomposting
- Illinois Extension: Worm Composting Is a DIY Project for All Ages
This independently written guide combines published vermiculture and axolotl husbandry guidance with Pat’s firsthand worm-bin experience.